API Rate Limiting란?
API Rate Limiting은 API에 대한 요청 수를 일정 시간 동안 제한하는 메커니즘이다. 주로 서비스의 안정성을 유지하고, 특정 API에 대한 과도한 요청으로 인해 발생할 수 있는 문제를 방지하기 위해 사용된다. 예를 들어, 특정 API가 초당 100개의 요청만 허용한다고 설정하면, 그 한도를 초과하는 요청은 차단되거나 지연 처리된다.
이를 Throttling이라고 한다. 정해진 시간 동안 처리할 수 있는 operation의 수를 정하는 것이다.
처리율 제한 장치는 어디에 두는 것이 좋을까?
- 클라이언트에 둔다면? 클라이언트 요청은 쉽게 위변조가 가능해서 안정적으로 처리율 제한을 걸 수가 없다.
- 서버측에 두는 방법도 있다.
- 처리율 제한 미들웨어를 만들어서, 해당 미들웨어가 API서버로 가는 요청을 통제하도록 할 수도 있다.
- 이 경우, 처리율 제한 갯수보다 더 많은 요청이 들어왓을 경우, 처리율 제한 미들웨어가 클라이언트로 HTTP 상태코드 429(Too Many Requests)를 반환해준다.
- 처리율 제한 장치는 보통 API 게이트웨이라 불리는 컴포넌트에 구현된다.
- API gateway는 아래의 기능을 가지고 있다:
- 처리율 제한
- SSL 종단
- 사용자 인증
- IP 허용 목록 관리 등 지원
- API 게이트웨이 계층에서의 속도 제한은 API 게이트웨이 인프라 내에서 속도 제한 규칙을 구성하는 것을 포함한다. 다운스트림 서비스로 전달되기 전에 API 게이트웨이에서 수신한 들어오는 요청에 적용된다. 게이트웨이를 통해 노출되는 모든 API와 서비스에 대한 속도 제한 정책에 대한 중앙 집중식 제어를 제공한다. 여러 API에 대한 글로벌 속도 제한을 적용하고, 공개 API에 대한 액세스를 제어하고, 과도한 트래픽으로부터 백엔드 서비스를 보호하는 데 적합하다.
왜 Rate Limit이 필요한가?
- 과도한 트래픽으로부터 서비스를 보호
- Resource 사용에 대한 공정성과 합리성 유도
- 트래픽 비용이 서비스 예산을 넘는 것을 방지
- DDos 공격 방지
- 데이터 스크래핑 방지
- Rate에 대해 과금을 부과하는 Business Model로 활용
Throttling의 종류
- Hard Throttling: throttle limit을 엄격하게 관리 (무조건 limit에 딱 맞춤)
- Soft Throttling: 특정 퍼센트까지는 limit을 넘기는 것을 허용 (10%까지라면, limit에서 10% 더 가능)
- Elastic or Dynamic Throttling: 서버 자원의 여유가 잇을 때는 limit을 넘기더라도 요청을 허용함
구현 방식
Rate Limit 적용시 drop되는 요청 건에 대한 응답은?
클라이언트가 요청을 보내면, 미들웨어는 카운터가 인계치를 넘어섰는지 확인하고(Redis를 이용해) 요청을 처리하는 방식이다. 이 과정에서 한도가 초과되어 버려지는 Request는 HTTP Header를 통해 클라이언트에게 overflow 되었다고 전달된다.
429 HTTP Status를 반환할 때, Header에 아래 정보를 넣어주면 좋다.
X-RateLimit-Limit허용되는 요청의 최대 개수X-RateLimit-Remaining남은 요청 수X-RateLimit-Reset요청 최댓값이 재설정될 때까지의 시간
요청 수는 어떻게 저장할 것인가? 카운터는 어디에 있어야 할까?
Rate Limit API는 각 클라이언트가 만든 요청 수를 추적해야 한다.
- Redis 혹은 Cassandra같은 데이터베이스를 사용하여 요청 수를 저장할 수 있다. 그런데 데이터베이스 작업은 느리기 때문에, Redis같은 in-memory cache로 처리하면 좋다.
- 두 가지 command가 필요하다. Redis의 rate limiting 문서 있다.
Rate Limit을 분산환경에서 구현할 때 우려되는 것
Inconsistency
여러개의 앱서버들이 분산되어 다른 region에서 동작하고 있는 경우, global rate limiter가 필요하다.
-
Sticy Session
로드밸런서에 sticky session을 두고, 특정 유저는 특정 node로만 request를 가도록 해서, local rate limiter를 활용하도록 한다. 이 방법은 scaling할 수 없고, 해당 node가 다운되었을 때 대응을 할 수 없다. -
Centralized Data store
Redis나 Cassancra와 같은 중앙화된 data store를 사용해서 rate limit 정보를 저장한다. 지연 시간이 문제가 될 수 있지만, 조금 더 나은 해결책이다.
Race Condition
concurrency가 높아지는 경우, race condition이 발생할 수 있다. 각 node에서 동시에 같은 counter를 저장하려고 하는 경우, counter가 증가하지 못하는 문제가 발생할 수 있기 때문이다. read-write operation에 lock을 활용할 수 있지만, 지연 시간 문제가 발생할 수 있다.
Rate Limiting 알고리즘
1. Token Bucket Algorithm 🌟 토큰 버킷

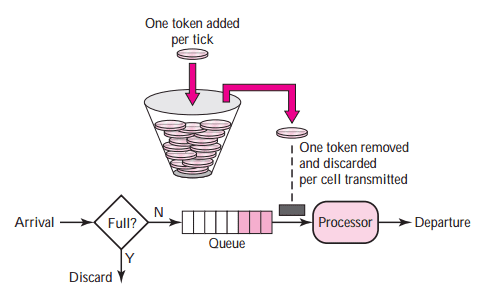
Token Bucket Algorithm은 가장 널리 사용되는 Rate Limiting 알고리즘 중 하나다. 이 알고리즘은 다음과 같은 방식으로 작동한다
- 일정한 속도로 토큰을 버킷에 추가한다. 버킷은 정해진 크기를 가지고 있으며, 최대 크기를 초과할 수 없다.
- 클라이언트가 요청을 보낼 때마다 버킷에서 토큰 하나를 소모한다. 만약 버킷에 토큰이 남아있지 않다면 요청이 거부ss되거나 지연된다.
- 충분한 토큰이 있는 경우: 버킷에서 토큰 하나를 꺼낸 후, 요청을 시스템에 전달한다.
- 충분한 토큰이 없는 경우: 해당 요청은 버려진다 (dropped)
- 토큰이 버킷에 충분히 있다면 요청이 즉시 처리된다.
구현 방법
- 2개의 parameter
- 버킷 크기 : 버킷에 담을 수 있는 토큰의 최대 개수
- 토큰 공급률(refill rate) : 초당 몇 개의 토큰이 버킷에 공급되는가
- 버킷의 크기:
공급 제한 규칙마다 버킷 개수가 다를 것이다.
- 통상적으로는 API endpoint마다 별도의 버킷을 둔다. 사용자마다 업로드 제한 정책이 있다면, 사용자마다 n개의 버킷을 둘 것이다.
- IP 주소별로 처리율 제한을 적용해야 한다면 IP 주소마다 버킷을 하나씩 할당해야 한다.
- 시스템 처리율을 초당 10,000개로 제한하고 싶다면, 모든 요청이 하나의 버킷을 공유하도록 해야 할 것이다.
유의할 점
- 분산시스템에서, 만약 하나의 토큰만 남아있는 상황에서 두 서버의 Redis 작업이 서로 겹치면 두 요청 모두 허용될 것이다.
- Redis lock을 획득한다면 원자성을 지킬 수 있겠지만, 동시 요청 처리 속도를 늦추는 대가를 치르게 된다.
- 이를 방지하려면, Lua scripting을 이용해 Redis의 작업을 원자적으로 만들 수 있다.
장단점
장점:
- 구현이 쉽다.
- 메모리 사용 측면에서 효율적이다.
- 짧은 시간 burst 트래픽(짧은 시간 내에 집중된 트래픽)을 허용하면서도 전체적인 요청 속도를 제한하는 데 유용하다. 버킷에 남은 토큰이 있기만 하면 요청은 시스템에 전달될 것이다.
단점:
- 버킷 크기와 토큰 공급률이라는 두 개의 인자를 가지고 있는데, 이 값을 튜닝하는 것이 까다로운 일이다.
구현 코드 예시
1
2
3
4
5
6
7
8
9
10
11
12
13
14
15
16
17
18
19
20
21
22
23
24
25
26
27
28
29
30
31
32
33
34
35
36
37
38
39
40
41
42
43
import java.time.Duration;
import java.time.Instant;
import java.util.concurrent.atomic.AtomicLong;

public class TokenBucketRateLimiter {
    private final long capacity;
    private final AtomicLong tokens;
    private final Duration refillPeriod;
    private volatile Instant lastRefillTime;

    public TokenBucketRateLimiter(long capacity, Duration refillPeriod) {
        this.capacity = capacity; // maximum 처리량
        this.tokens = new AtomicLong(capacity); // 처리 가능한 토큰의 갯수
        this.refillPeriod = refillPeriod; // 토큰이 리필되는 기간
        this.lastRefillTime = Instant.now(); // 마지막 토큰리필 시각
    }

    public synchronized boolean isAllowed() {
        refillTokens();

        long currentTokens = tokens.get();
        if (currentTokens > 0) {
            tokens.decrementAndGet();
            return true; // Request is allowed
        }

        return false; // Request is not allowed
    }

    /**
     * Refills tokens in the token bucket based on the refill period.
     */
    private synchronized void refillTokens() {
        Instant now = Instant.now();
        long timeElapsed = Duration.between(lastRefillTime, now).toMillis();
        long tokensToAdd = timeElapsed / refillPeriod.toMillis();

        if (tokensToAdd > 0) {
            lastRefillTime = now;
            tokens.getAndUpdate(currentTokens -> Math.min(capacity, currentTokens + tokensToAdd));
        }
    }
}
Bucket4j 라이브러리
Java rate-limiting library based on token-bucket algorithm
1
2
3
4
5
6
7
8
9
10
11
12
13
14
15
16
import io.github.bucket4j.Bucket;

...
// bucket with capacity 20 tokens
// with refilling speed 1 token per each 6 second
private static Bucket bucket = Bucket.builder()
      .addLimit(limit -> limit.capacity(20).refillGreedy(10, Duration.ofMinutes(1)))
      .build();

private void doSomethingProtected() {
   if (bucket.tryConsume(1)) {
      doSomething();
   } else {
      throw new SomeRateLimitingException();
   }
}
Guava
Rate Limter가 있는 Google Core Libraries for Java
1
2
3
4
5
6
7
8
 final RateLimiter rateLimiter = RateLimiter.create(2.0); // rate is "2 permits per second"
 void submitTasks(List<Runnable> tasks, Executor executor) {
   for (Runnable task : tasks) {
     rateLimiter.acquire(); // may wait
     executor.execute(task);
   }
 }
2. Leaky Bucket Algorithm 🌟 누출 버킷

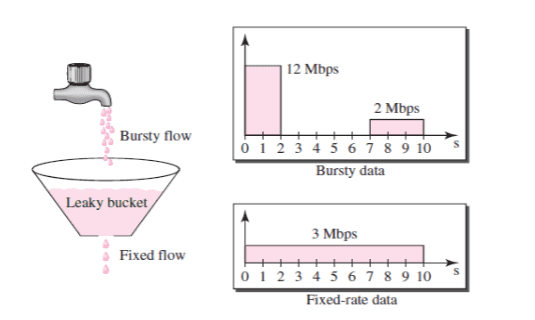
Leaky Bucket Algorithm은 토큰 버킷 알고리즘과 비슷하지만, 트래픽 흐름을 더욱 일정하게 유지하도록 설계되었다.
- 버킷에 물(데이터 패킷)이 들어오면, 일정한 속도로 물이 새어 나온다.
- 만약 버킷에 물이 넘치면 초과된 물(추가 요청)은 버려진다.
이 알고리즘은 트래픽이 갑자기 증가하는 것을 방지하고, 일정한 속도로 트래픽을 처리하는 데 효과적이다.
구현 코드 예시
1
2
3
4
5
6
7
8
9
10
11
12
13
14
15
16
17
18
19
20
21
22
23
24
25
26
27
28
29
30
31
32
33
34
import java.time.Duration;
import java.util.concurrent.atomic.AtomicLong;

public class LeakyBucketRateLimiter {
    private final long capacity;
    private final long ratePerSecond;
    private final AtomicLong lastRequestTime;
    private final AtomicLong currentBucketSize;

    public LeakyBucketRateLimiter(long capacity, long ratePerSecond) {
        this.capacity = capacity;
        this.ratePerSecond = ratePerSecond;
        this.lastRequestTime = new AtomicLong(System.currentTimeMillis());
        this.currentBucketSize = new AtomicLong(0);
    }

    public synchronized boolean isAllowed() {
        long currentTime = System.currentTimeMillis();
        long elapsedTime = currentTime - lastRequestTime.getAndSet(currentTime);

        // Calculate the amount of tokens leaked since the last request
        long leakedTokens = elapsedTime * ratePerSecond / 1000;
        currentBucketSize.updateAndGet(bucketSize ->
                Math.max(0, Math.min(bucketSize + leakedTokens, capacity)));

        // Check if a request can be processed by consuming a token from the bucket
        if (currentBucketSize.get() > 0) {
            currentBucketSize.decrementAndGet();
            return true; // Request is allowed
        }

        return false; // Request is not allowed
    }
}
3. Fixed Window Counter 🌟 고정 윈도우 카운터

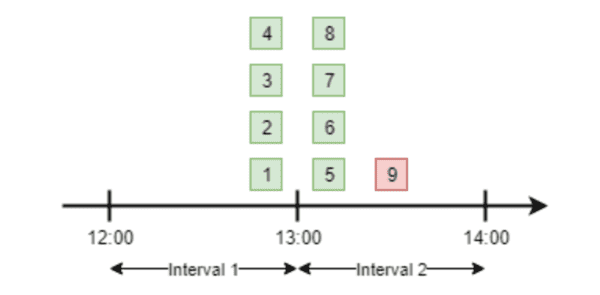
Fixed Window Counter는 간단하면서도 효과적인 방법이다.
- 일정한 시간 창(예: 1분, 1시간 등)을 정의하고, 그 시간 동안의 요청 수를 카운트한다.
- 요청 수가 설정한 한도를 초과하면, 해당 시간 창이 끝날 때까지 추가 요청이 거부된다.
이 방법은 구현이 간단하지만, 시간 창 경계에서 트래픽이 집중될 때 “thundering herd” 문제(한 시간 창의 끝에서 시작으로 넘어가는 시점에 많은 요청이 몰리는 현상)가 발생할 수 있다.
구현 코드 예시
1
2
3
4
5
6
7
8
9
10
11
12
13
14
15
16
17
18
19
20
21
22
23
24
25
26
27
28
29
30
31
32
33
34
35
36
37
38
39
40
41
42
43
44
45
46
47
48
49
50
51
52
53
54
55
import java.util.HashMap;
import java.util.Map;

public class RateLimiter {
    private final int maxRequestPerWindow;
    private final long windowSizeInMillis;
    private final Map<String, Window> store = new HashMap<>();

    public RateLimiter(int maxRequestPerWindow, long windowSizeInMillis) {
        this.maxRequestPerWindow = maxRequestPerWindow;
        this.windowSizeInMillis = windowSizeInMillis;
    }

    public synchronized boolean isAllowed(String clientId) {
        long currentTimeMillis = System.currentTimeMillis();
        Window window = store.get(clientId);

        // If the window doesn't exist or has expired, create a new window
        if (window == null || window.getStartTime() < currentTimeMillis - windowSizeInMillis) {
            window = new Window(currentTimeMillis, 0);
        }

        // Check if the number of requests in the window exceeds the maximum allowed
        if (window.getRequestCount() >= maxRequestPerWindow) {
            return false; // Request is not allowed
        }

        // Increment the request count and update the window in the store
        window.setRequestCount(window.getRequestCount() + 1);
        store.put(clientId, window);
        return true; // Request is allowed
    }

    private static class Window {
        private final long startTime;
        private int requestCount;

        public Window(long startTime, int requestCount) {
            this.startTime = startTime;
            this.requestCount = requestCount;
        }

        public long getStartTime() {
            return startTime;
        }

        public int getRequestCount() {
            return requestCount;
        }

        public void setRequestCount(int requestCount) {
            this.requestCount = requestCount;
        }
    }
}
4. Sliding Window Log 🌟 이동 윈도우 로그

Sliding Window Log는 Fixed Window Counter의 문제를 해결하기 위해 고안된 알고리즘이다.
- 요청이 발생할 때마다 타임스탬프를 기록하고, 이 타임스탬프를 기반으로 일정한 시간 창 내의 요청 수를 계산한다.
- 시간 창 내의 요청 수가 한도를 초과하면 요청이 거부된다.
이 알고리즘은 시간 창 경계에서 발생하는 트래픽 집중 문제를 줄여준다. 하지만 타임스탬프를 저장해야 하므로 메모리 사용량이 증가할 수 있다.
5. Sliding Window Counter 🌟 이동 윈도우 카운터

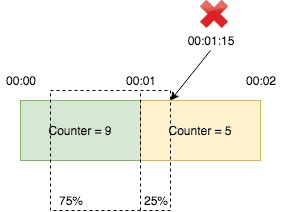
Sliding Window Counter는 Sliding Window Log와 유사하지만, 메모리 효율성을 높이기 위한 방법이다.
- 시간을 작은 구간(예: 1초)으로 나누고, 각 구간의 요청 수를 카운트한다.
- 전체 시간 창 동안의 요청 수를 계산하기 위해 현재 구간과 이전 구간의 카운트를 사용하여 요청 수를 계산한다.
이 방식은 로그를 저장할 필요가 없으므로 메모리 사용량이 줄어들지만, 여전히 시간 창 경계에서 약간의 부정확성이 발생할 수 있다.
구현 코드 예시
1
2
3
4
5
6
7
8
9
10
11
12
13
14
15
16
17
18
19
20
21
22
23
24
25
26
27
28
29
30
31
32
33
34
35
36
import java.util.Deque;
import java.util.concurrent.ConcurrentHashMap;
import java.util.concurrent.ConcurrentLinkedDeque;

public class SlidingWindowRateLimiter {
    private final int maxRequests;
    private final long windowSizeInMillis;
    private final ConcurrentHashMap<String, Deque<Long>> timestamps = new ConcurrentHashMap<>();

    public SlidingWindowRateLimiter(int maxRequests, long windowSizeInMillis) {
        this.maxRequests = maxRequests;
        this.windowSizeInMillis = windowSizeInMillis;
    }

    public boolean isAllowed(String clientId) {
        // Get the timestamp deque for the client, creating a new one if it doesn't exist
        Deque<Long> clientTimestamps = timestamps.computeIfAbsent(clientId, k -> new ConcurrentLinkedDeque<>());

        // Get the current timestamp in milliseconds
        long currentTimeMillis = System.currentTimeMillis();

        // Remove timestamps older than the sliding window
        while (!clientTimestamps.isEmpty() && currentTimeMillis - clientTimestamps.peekFirst() > windowSizeInMillis) {
            clientTimestamps.pollFirst();
        }

        // Check if the number of requests in the sliding window exceeds the maximum allowed
        if (clientTimestamps.size() < maxRequests) {
            clientTimestamps.addLast(currentTimeMillis);
            return true; // Request is allowed
        }

        return false; // Request is not allowed
    }
}
6. Exponential Backoff
Exponential Backoff는 주로 요청 실패 시 재시도 전략으로 사용되지만, Rate Limiting과 함께 적용할 수 있다.
- 클라이언트가 요청을 보냈을 때, 실패한 경우 재시도 간격을 기하급수적으로 증가시킨다.
- 이 방법은 서버 과부하를 방지하고, 클라이언트의 요청이 연속적으로 거부되는 것을 방지하는 데 유용하다.
이 방법은 주로 API Rate Limiting 상황에서 요청을 관리하고, 시스템에 부하를 줄이기 위한 보조 전략으로 사용된다.
Token Bucket이나 Leaky Bucket 같은 알고리즘은 버스트 트래픽을 관리하는 데 효과적이고, Fixed Window Counter나 Sliding Window Counter는 구현이 단순하면서도 실용적이다. Exponential Backoff는 재시도 로직에 유용하게 적용할 수 있는 추가적인 전략이다.
reference
서비스 가용성 확보에 필요한 Rate Limiting Algorithm에 대해
How to Design a Rate Limiter API | Learn System Design
가상 면접 사례로 배우는 대규모 시스템 설계 기초
(Slow Down! Rate Limiting Deep Dive)[https://www.codereliant.io/rate-limiting-deep-dive/]
()[https://hogwart-scholars.tistory.com/entry/Spring-Boot-%EC%9E%90%EB%B0%94-%EC%8A%A4%ED%94%84%EB%A7%81%EC%97%90%EC%84%9C-%EC%B2%98%EB%A6%AC%EC%9C%A8-%EC%A0%9C%ED%95%9C-%EA%B8%B0%EB%8A%A5%EC%9D%84-%EA%B5%AC%ED%98%84%ED%95%98%EB%8A%94-4%EA%B0%80%EC%A7%80-%EB%B0%A9%EB%B2%95]